|
|
[ < ]
[ Help Home ]
[ > ]
Doing Your Job in WebLab
- Utility - Handful Tools

Utilities are just some light-weight "widgets" for bioinformatics analysis. Javascript, Java Applet and other browser based client side programs are the main components of utility. They always do not need
much time to execute; however, you will find they are pretty useful.
Till now, there are in total 66 utilities in WebLab. Most of them focus on sequence edit, data visualization and so on.
Note: When you run utility in WebLab, please make sure that your operating system has already installed Java Runtime Environment, besides let your Internet browser enable both Java and JavaScript.
- Program - the Build Blocks
- Overview

Programs in WebLab include three different types of service:
- Local Program: These programs are running in the computing nodes of WebLab. Most of them come from the most popular bioinformatics analysis software package such as EMBOSS, NCBI BLAST etc.
- Web Service Program: Now Web Service becomes more and more hot in bioinformatics domain, WebLab provides some client side programs for the Web Service in some famous bioinformatics web site.
You can submit jobs to the remote Web Service provider through our corresponding web interface.
- Grid Service Program: WebLab also provides some grid based programs to deal with the programs which are compute&IO-intensive just like BLAST.
Till now, there are in total 274 programs available in WebLab.
Users can browse them according to their software package, function or alphabet of their names.
- Run Program
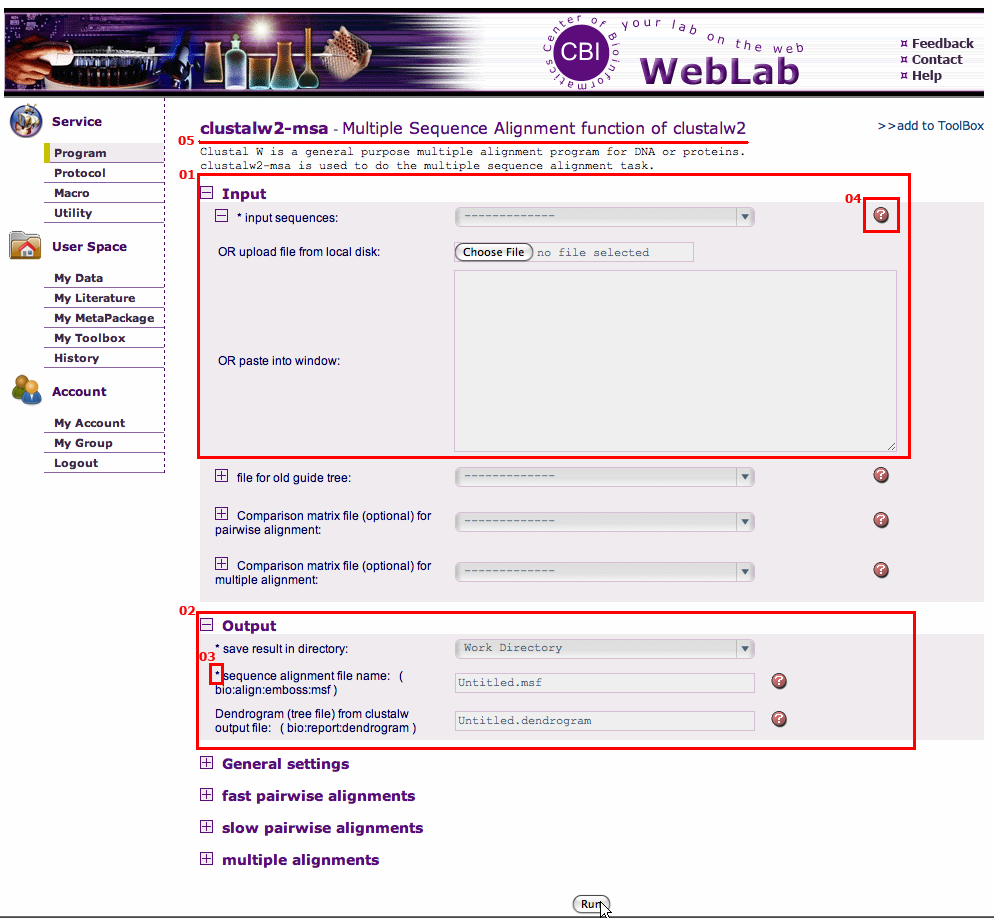
For different program services, WebLab provides unified and intuitive web interface for integrated tools, which will help users start the analysis easily.
In program submitting page, parameters with similar function will be grouped together. Users need to pay attention to the following aspects before submitting a job.
- For input files, guest users can upload a file or paste directly into the input window; while registered users can use the data stored at My Data as input.
- Registered user needs to specify the directory to save output into.
- Parameters with an asterisk sign are required to fill in.
- If you do not understand the meaning of a single parameter, please click the corresponding question mark on the right to get help.
- If you want to get detailed information of the program, please click the program title to get the program document.
After providing proper value for each parameter, please click "Run" button to submit the job.
 [+] Enlarge the image
When you submit your job, the portal server will look up for appropriate computing node and then send request to it.
The dispatch daemon running on the computing server will execute the required program after accepting the request.
The result will be sent back to the portal server after the analysis finished.
A job may have five status, click here to get more information about job status and how to control your job in WebLab.
If your job finished without exception, you will see the result data just like you click it in My Data. Certainly, you can select different result to view in "Result" pull-down menu.
About the data viewing page, please click here to get more detailed instruction.
- Workflow (Protocol & Macro) - A Nice Bundle
- Overview
- What is Workflow
Bioinformatics analysis is often a complex task that involves numerous bioinformatics tools. Traditional tool-oriented platforms lack interoperability, users have to pass data between tools and execute them each by hand;
while WebLab supports workflows, which automate the analysis procedure of multiple tools according to a set of rules.
- Two Types Workflow in WebLab
WebLab categorizes workflows into two types according to interaction ability:
a) Protocol: Its execution needs user interaction, which gives users possibility to change program parameters and execution order.
b) Macro: It can automatically execute, which simplify the routine analysis work. After input mandatory parameters, the macro will run until end without the need of user interaction.
- Workflow Model in WebLab
The workflow model is represented as XML format in server's file system and as DAG (Directed Acyclic Graph) in memory. The rectangle nodes of the DAG appear as a program or a macro -
which means that WebLab support recursive workflow definition, you can use macro as a component of another workflow - diamond nodes stands for operator and the edge stands for the data flow.
Operators control the execution of workflows. Now there are two types of operators in the model:
a) Condition Operator: This operator determines which analysis flow will be executed next according to the input condition.
Note: Now in WebLab there is one type of choice operator - SeqTypeConditioner through which you can judge whether your data is a protein or nucleotide sequence, next choose different analysis process accordingly.
Choice branch and choice end together function as "Condition Operator".
A "choice branch" first splits the process flow into several mutually exclusive ones - of course, only one of these analysis flows will be executed - and there is always a "choice end" to combine these flows into one later.
b) Parallel Operator : This operator allows several tools execute simultaneously on the same input. This is useful to compare the result of different tools with the same purpose.
Parallel branch and parallel end together function as "Parallel Operator".
A "parallel branch" shares incoming data flow to several outgoing activities, and there is always a "parallel end" to combine several data flows into one later.
- Pre-Defined Workflow
WebLab has already pre-defined some workflows including DNA analysis, protein analysis, phylogeny analysis and metabolic pathway identification etc, to facilitate bench workers.
- Run Workflow
- Run Protocol
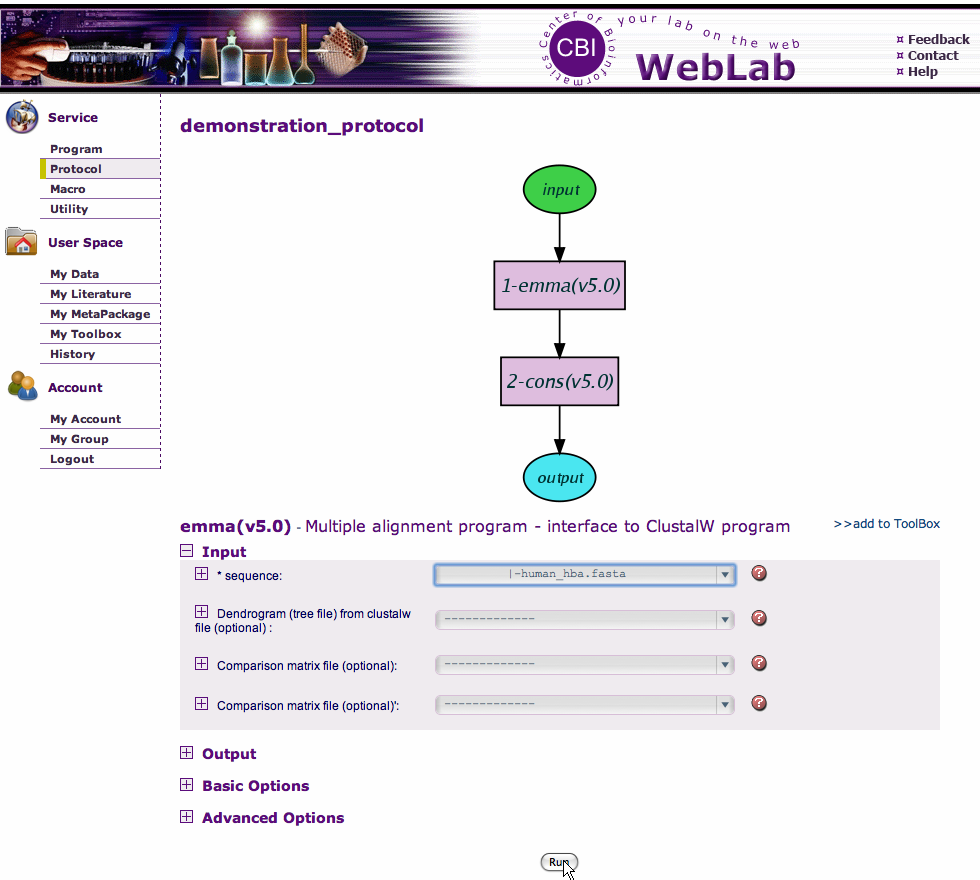
The following example will demonstrate how to run protocol in WebLab. The illustrating protocol includes only two analysis programs as activities. The first one is emma,
a multiple sequence alignment program. The second one is cons, which will create a consensus from multiple alignment produced by emma.
In principle, you can click any activity to run, but in general, you should click the start activity - the activity without parent activity, in this case is emma - to start the whole protocol.
Note: Please note that every workflow in WebLab can have one and only one start activity.
a). The protocol program submitting page is just like the page when you submit the program independently. The only difference is that you can find the DAG of the protocol in the upper half of the page.
After providing all the proper parameters, click run to submit the activity of the protocol.
 [+] Enlarge the image
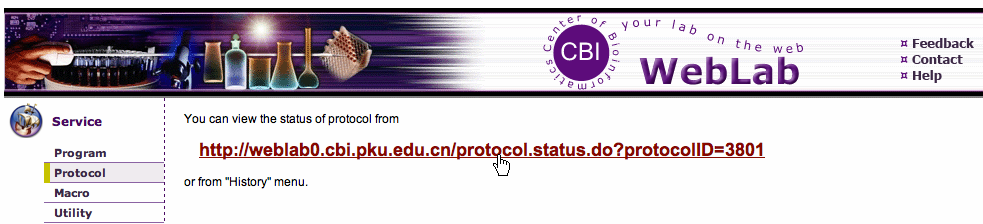
b). You will see the following page, you can click the hyperlink to check the running status of your protocol.
 [+] Enlarge the image
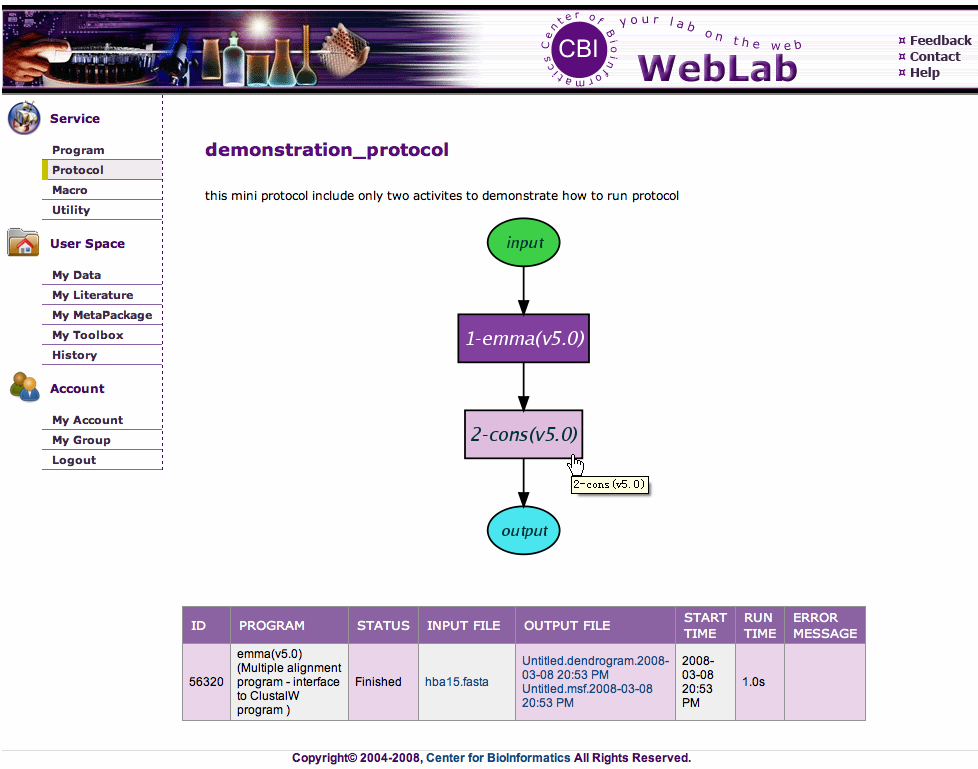
c). You can see that the rectangle for the activity - emma - has been filled with purple, which means that this activity finished successfully; if the activity is still running, the corresponding
rectangle will be filled with olivine; and if the activity has failed, the corresponding rectangle will be filled red.
You can check detailed information for submitted activities in the table below.
 [+] Enlarge the image
You can then select next activity to run according to the above a), b) and c) steps circularly until the whole protocol is finished. Please note that you can adjust every parameter of each activity during the protocol execution,
which is the significance of protocol in WebLab.
- Run Macro
When you run macro in WebLab, the process is completely different from running protocol in WebLab. The only similarity with running protocol is that the above a), b), c) steps are still necessary.
However, there is something different you need to pay attention to.
- There is only one submiting page for all the activities in macro. You need to fill the mandatory parameters for all the activites before the macro running.
- Once you submit the macro, the built-in workflow engine will execute all the activities defined in the macro according to the corresponding DAG.
- When you enter the page to check the status of the macro at first time, most of the time your macro does not totally finish. There must be some activities still running. Please reload the current page to check the macro status again and again
until all the activities finish or fail.
The most significant aspect is that you submit the job only once and you need not to intervene during the macro running.
- User Customized Workflow
Though WebLab provides some pre-defined protocols and macros, they are not nearly enough for the practical analysis. Therefore, WebLab provides the mechanism which allows registered users to customize their own protocols and macros in web environment, which is
one of the most important highlights for our system.
Note: WebLab will lead you to define the "correct" workflow which can run properly, but please take charge of your workflow's validity which WebLab does not promise.
- Define Workflow
Registered users can define either protocols or macros in WebLab. The processes are relative different. The following is an example for constructing macro, you will know how to construct protocol also after you finish this example because the macro constructing process is more complex.
First of all, please click the "Create Your Macros" button to begin the macro construction process.
 [+] Enlarge the image
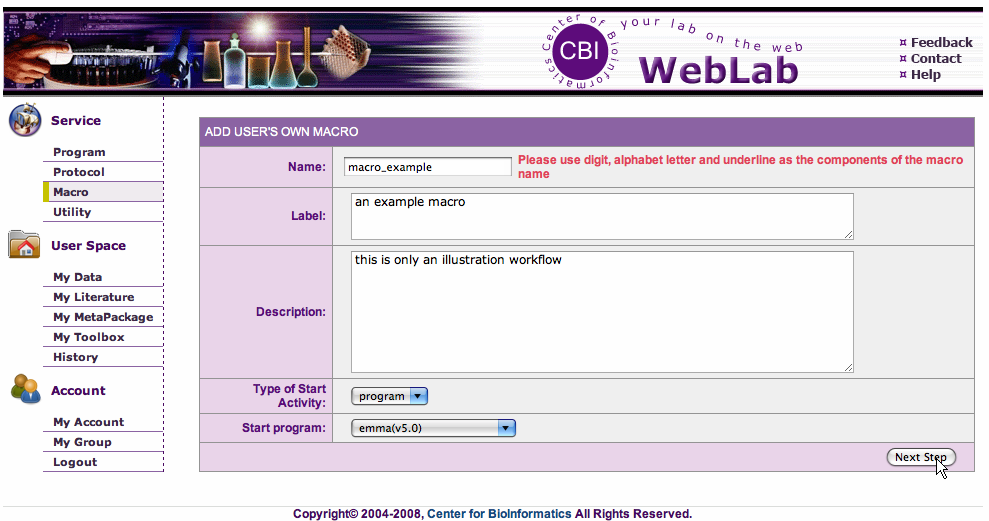
(1) The first step for macro/protocol construction is to give some basic information for the macro/protocol including a "name", a "label" which is a short description and a "description" which is more detailed.
(2) Then you need to select your start activity which can be program, system
pre-defined and your customized macro or operator. In this case, we choose a program emma.
Note: Please use digit, alphabet letter and underline as the components of the macro/protocol name.
 [+] Enlarge the image
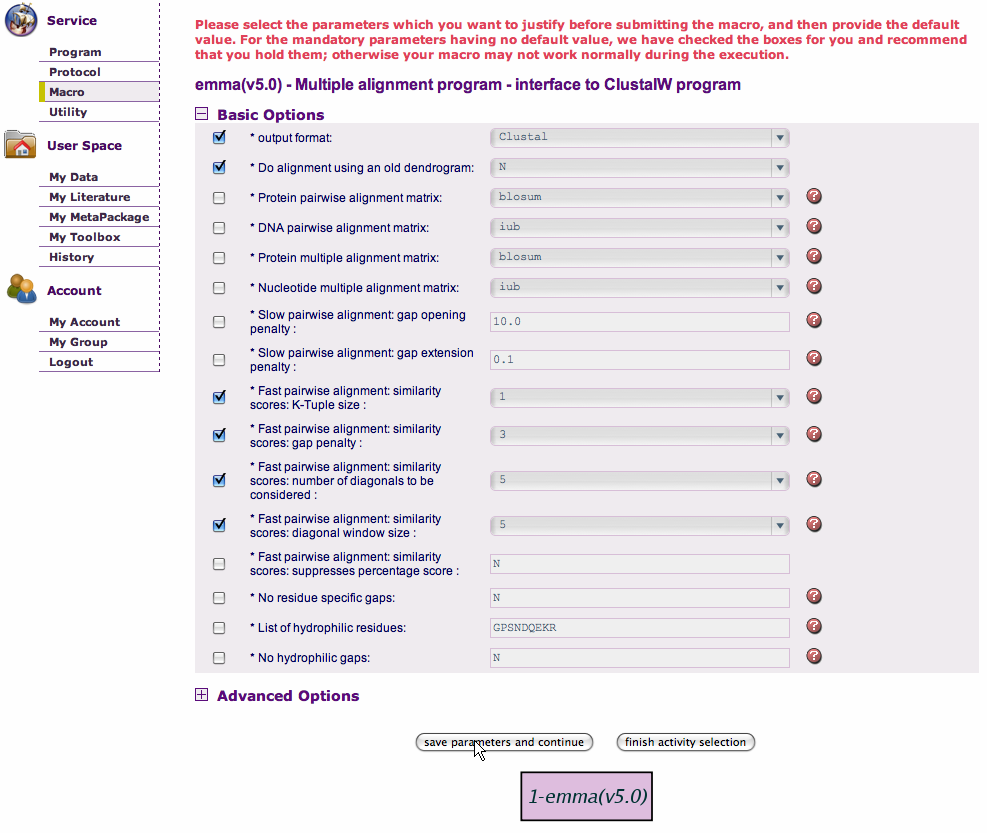
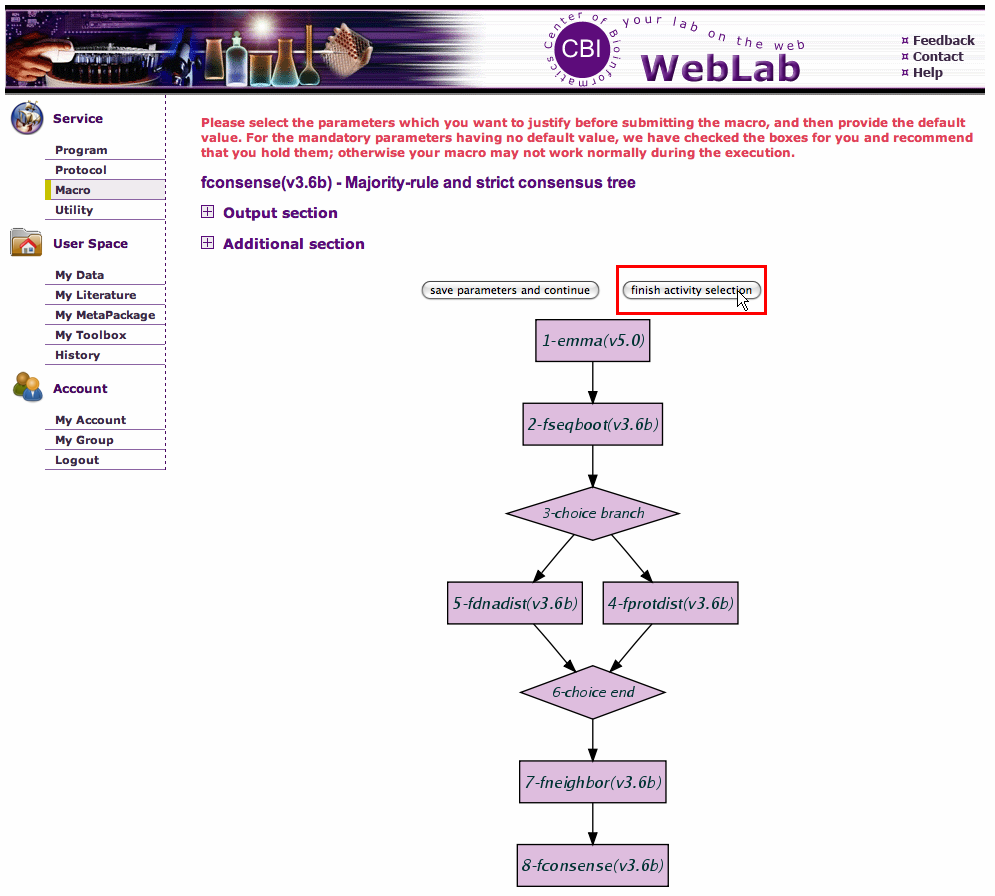
(3) After clicking "Next Step" button, you will enter the page to do some configuration for just selected activity. You can see the temporary DAG for the macro/protocol you are constructing in the bottom.
Please check the checkbox for the parameters you want to adjust before the macro's execution and modify the default value if you want.
Note: For the mandatory parameters which do not have default value, WebLab check them for you for the reason that probably your macro can not run properly without adjusting these parameters.
You can now choose to click "save parameters and continue" to continue the construction or "finish activity selection" to finish the construction. Now we choose "save parameters and continue".
 [+] Enlarge the image
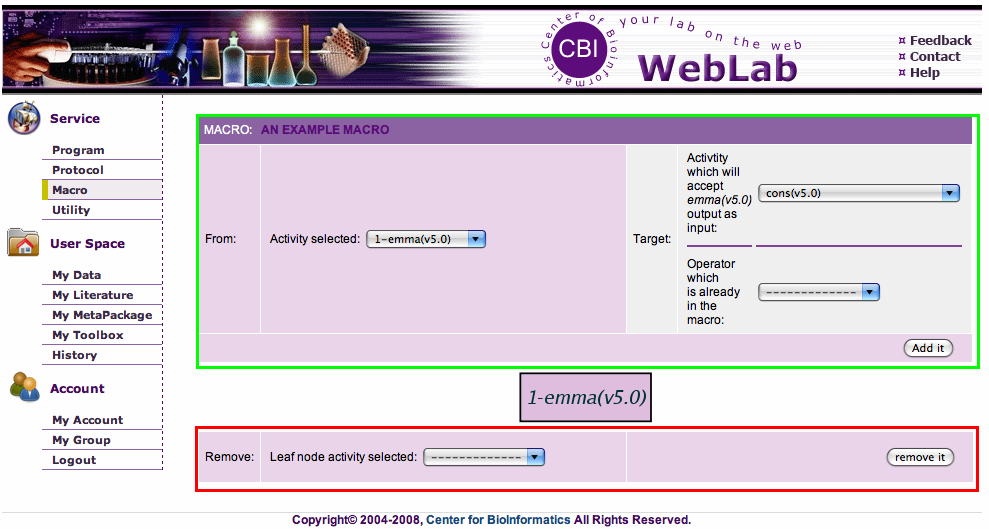
(4) Now you enter the page to extend the current workflow. Also, you can see the temporary DAG for your constructing workflow.
On the upper of the page, you can select a "source activity" which is already in the workflow and a "target activity" which is a either a new activity or a "end" operator already existed in the workflow
to form a new directed path in the DAG.
On the bottom of the page, you can select a node activity to remove from the current workflow.
Note: Please note that you can not delete the activity having subsequent activity.
 [+] Enlarge the image
Please pay more attention to this step:
Note: Please note that WebLab will give a basic judgement about whether the candidate new activity can accept the output of the source activity, in this case is emma,
as input. If the source activity's output is incompatible with the new activity's input, this activity in the pull-down menu will be marked red. However,
if you think the pipe link is logical, please choose the incompatible new activity without any hesitation.
 [+] Enlarge the image
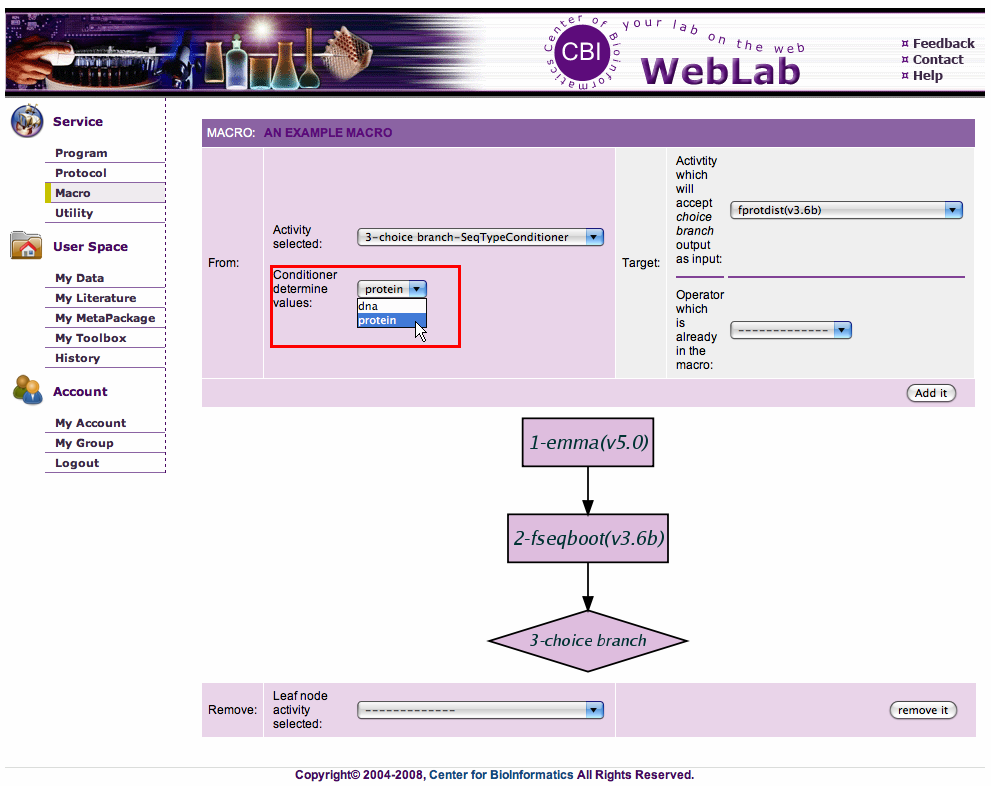
Note: When choice branch is the source activity, you need to associate each determine value, for SeqTypeConditioner is "protein" and "dna", to different target activity.
 [+] Enlarge the image
After clicking "Add it", you will again enter the page of parameter configuration for the newly selected activity. You can repeat the upper two steps until you finish the DAG for the workflow.
Now for protocol, you can click "finish protocol" to end the whole process for protocol construction.
For macro, after you click "finish activity selection", there is still something important you
need to do for macro construction.
 [+] Enlarge the image
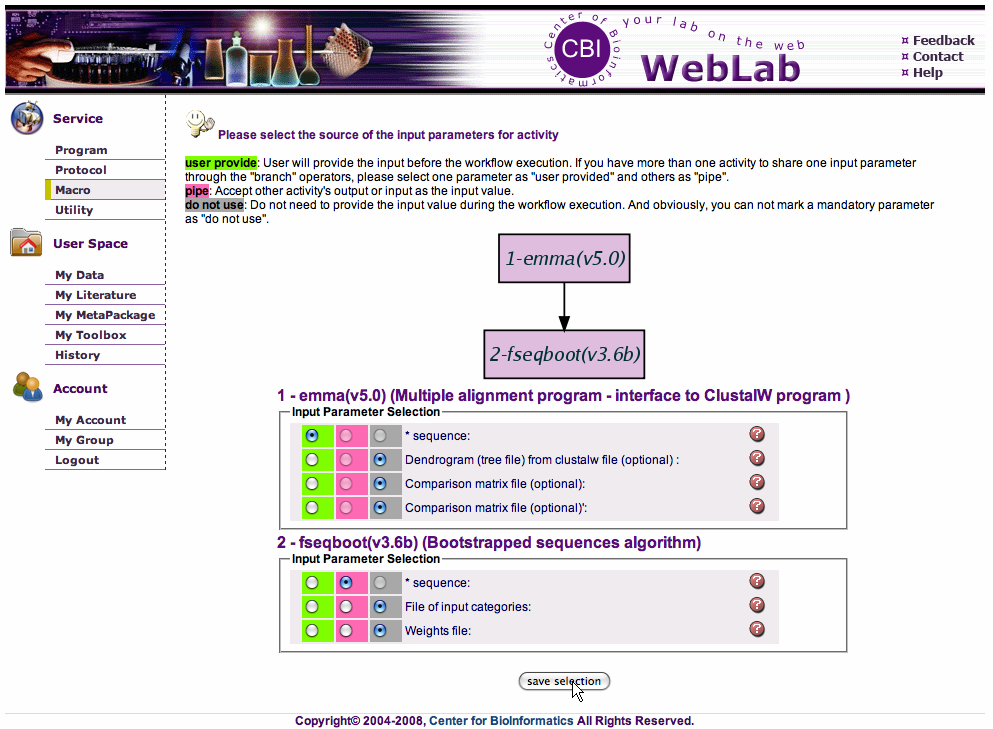
(5) In order to ensure that the every activity in macro can get proper input during the execution, you need to select the types of the input parameters for each activity. There are three types for input parameter.
- user provide: User needs to provide value for this type of parameter before submitting the macro, i.e. these are the global input parameters for the macro.
- pipe: Input parameter in this type means either it will accept other activity's output as its value or it will share "user provide" parameter just explained with other activity.
WebLab will guide you to assign source for pipe input parameters in next step.
- do not use:These parameters will not be used during the macro execution. In general, they are not mandatory input parameters.
Note: WebLab has already given a default type for each input parameter.
After assigning proper types for the input parameters, please click "save selection" button.
 [+] Enlarge the image
(6) Now you enter the final step for the macro construction. In this step you need to specify the source for the input parameters whose type is pipe.
Note: WebLab has also specified a default source for each pipe input parameter.
Now you can click "Save IO Pipe Association" to finish the whole process of macro construction.
 [+] Enlarge the image
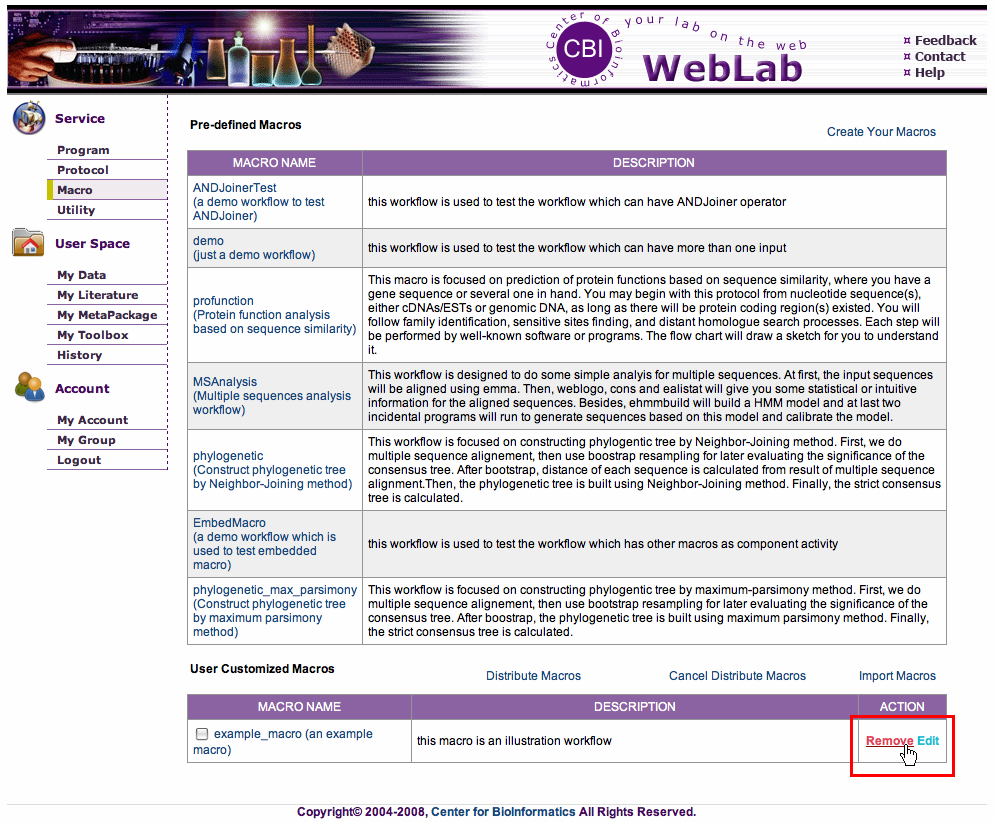
- Workflow Delete and Edit
You can click the "Remove" button to delete the corresponding user-customized protocol or macro.
Also, you can click the "Edit" button to edit the corresponding user-customized protocol or macro.
 [+] Enlarge the image
The edit process is actually an extension of the workflow constructing process. You can use the "remove it" button again and again to delete the improper activities and then add new ones. Besides, if you are editing macro,
at the end of construction you need to over again assign types to input parameters and then associate the source value to each pipe input parameter.
 [+] Enlarge the image
- Job controller - You're the Master of Your Jobs!
- Job Status
A job may have one of the five statuses as follows:
- submitted: When users fill in parameters and send request to run a program, a job is created with status "submitted".
- running: After validating the parameters and saving them in the database, a request is forwarded to the job scheduling program and the status of job is shifted to "running".
- in queue: The jobs will be marked as "in queue" if all nodes having the requested tool are high-loaded.
- finished: If the job runs smoothly, the results will be saved into the My Data with the status changed to "finished".
- failed: On the other hand, if the job fails for some reasons and exits incorrectly, the status will be shifted to "failed" and the detailed warning message will be displayed and logged.
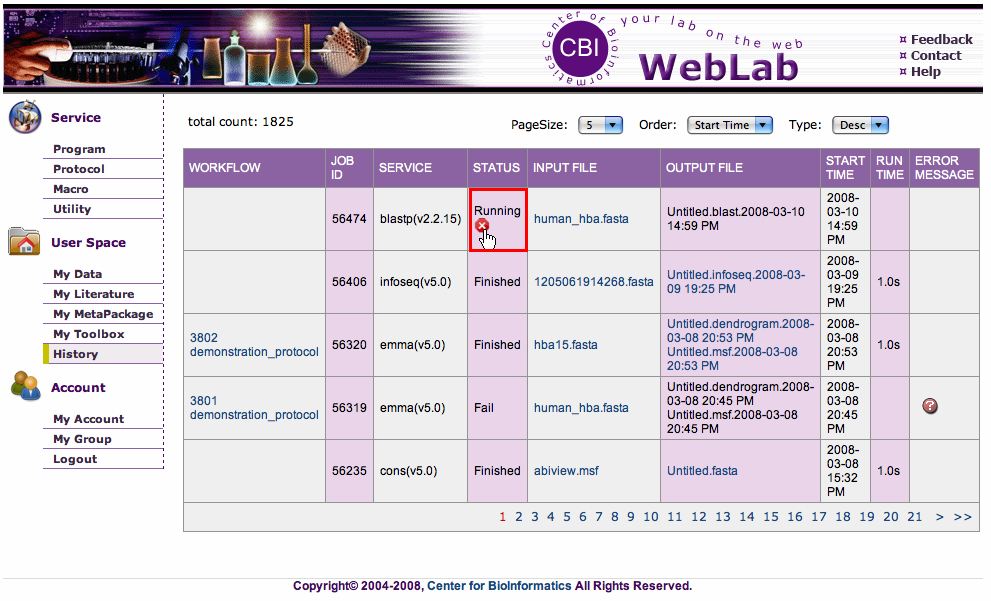
- Job History
Registered users can monitor the latest status of the submitted jobs by the��History�� functionality which lists detailed information.
 [+] Enlarge the image
- Job Control
For some jobs which are running for abnormal long time, you can choose to kill them in the analysis history page.
Note: Please note that at any time, you can have at most 30 jobs running simultaneously.
 [+] Enlarge the image
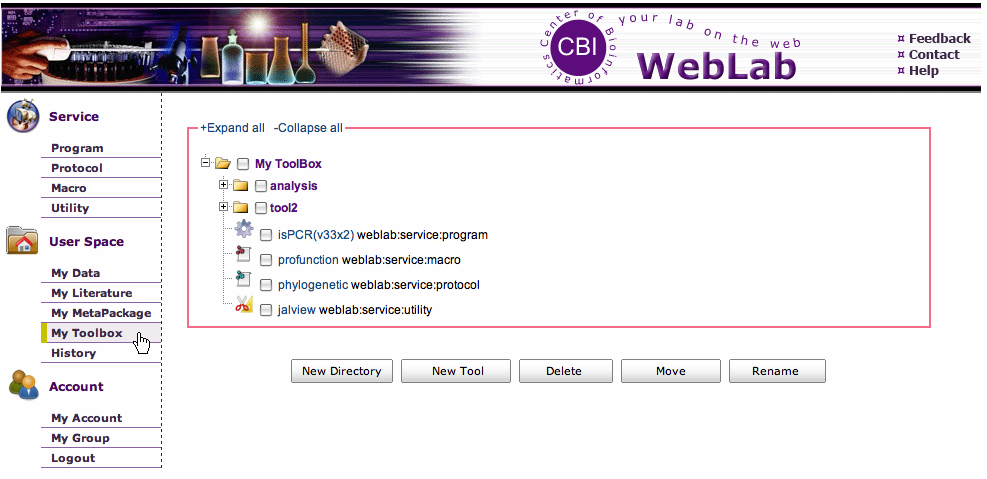
- My Toolbox - My Little Nice Toolkit
- Overview
Toolbox is the "Favorites" for the services in WebLab. My Toolbox is a user space similar to My Data. Registered users can use it to collect and organize programs, protocols, macros and utilities in WebLab conveniently.
 [+] Enlarge the image
- Use Toolbox
There is "add to Toolbox" button in the submitting pages for all the services in WebLab. If considering the service is useful, you can click the button to add the service into the toolbox.
 [+] Enlarge the image
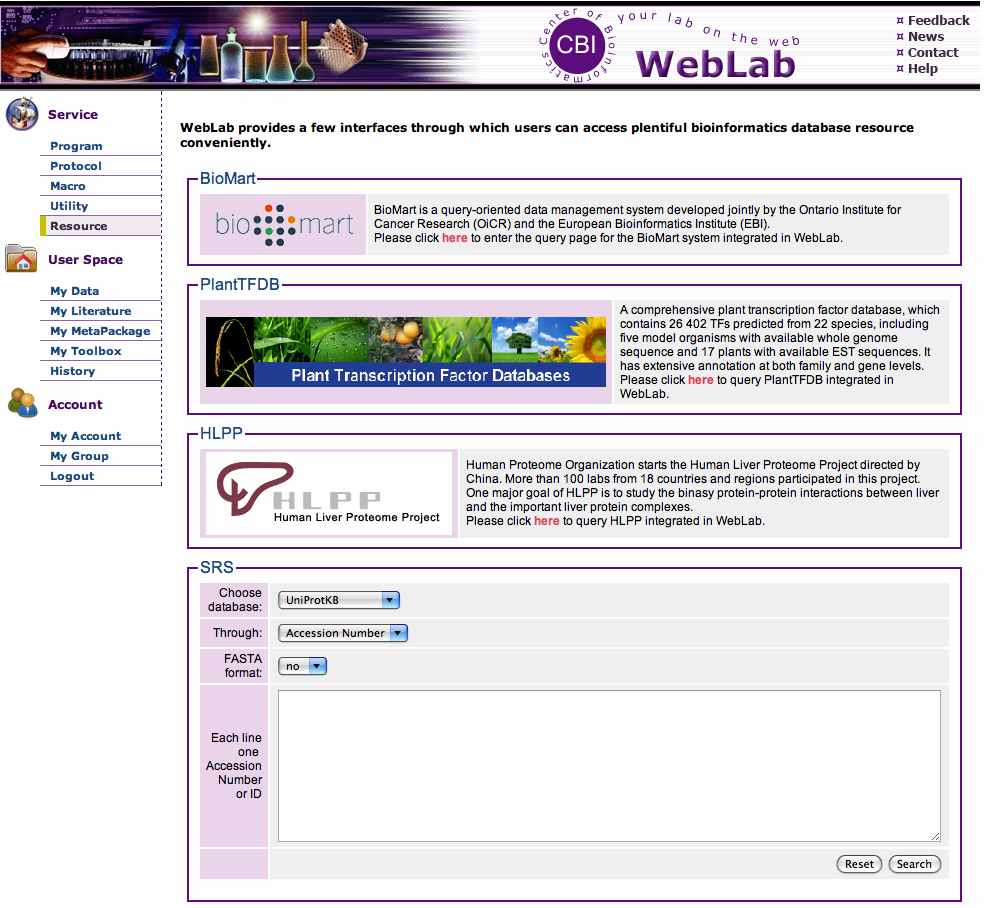
- Resource - Get Original Data
- Overview
WebLab provides resource module through which users can access plentiful bioinformatics database resource conveniently.
Moreover, user can save retrieved data in My Data for further work.
 [+] Enlarge the image
- Get Data
Now WebLab provides interfaces for BioMart, planttfdb and SRS.
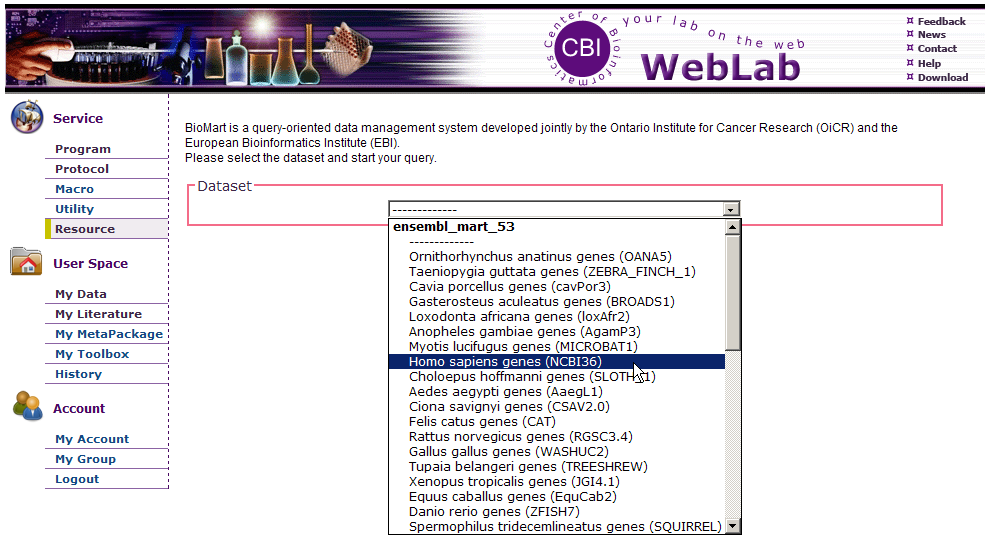
- BioMart
BioMart is a query-oriented data management system developed jointly by the Ontario Institute for Cancer Research (OiCR) and the European Bioinformatics Institute (EBI).
Get data through BioMart interface, you need first to select the dataset you want to query.
 [+] Enlarge the image
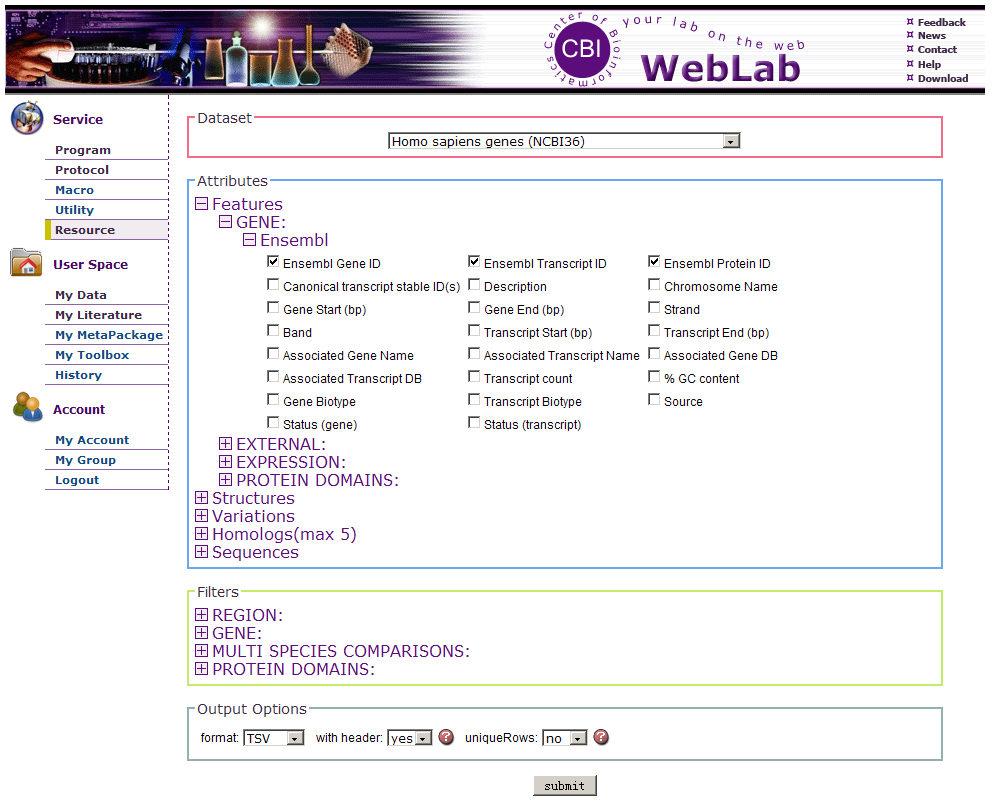
Then BioMart will collect related attributes and filters for you.
 [+] Enlarge the image
After selecting some attributes and filters, BioMart will get the result for you. In addition, you can set file name, specify the format and select the directory where you
want to save the data. Also, you can choose whether you want to save the query condition. Then, click "Save to My Data" button,
the result will be saved in your data space.
 [+] Enlarge the image
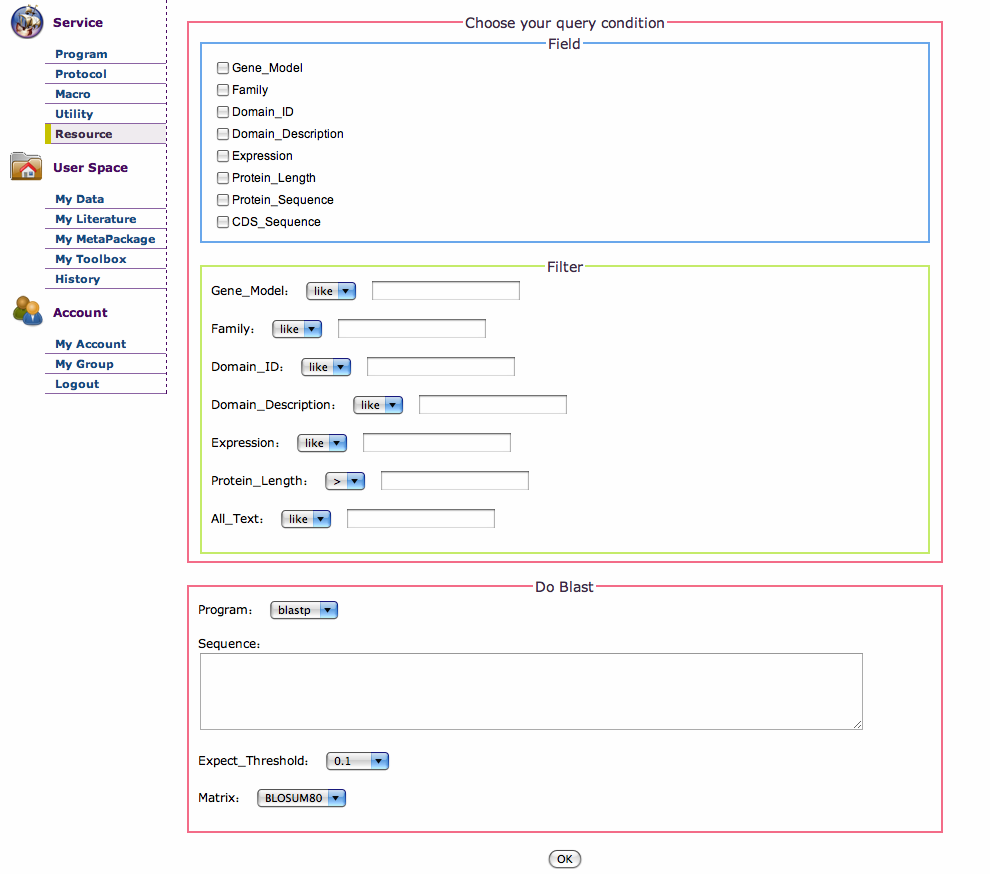
- PlantTFDB
PlantTFDB is a comprehensive plant transcription factor database developed by Center for Bioinformatics in China .
The query process in PlantTFDB is similar as in BioMart. However, here we provides Blast
function besides field and filter selection. User can do blast against the database they selected in the first step
while they query something.
And the result can be saved separately using different file names and file formats in data space.
 [+] Enlarge the image
- SRS
The Sequence Retrieval System (SRS) is the world's premier data integration, analysis and display tool for bioinformatics, genomics and related data.
Here, we provide two search methods.
- SRS ID/AC search.
Users need to select database, data format, and fill the interested sequence accession numbers/IDs. Each line one accession number or ID.
 [+] Enlarge the image
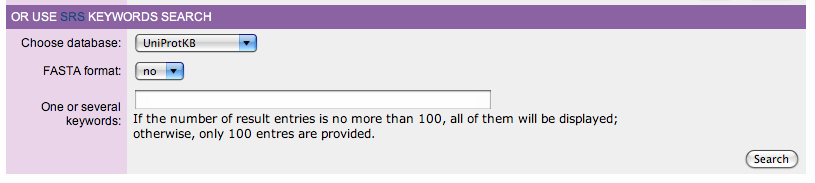
- SRS keyword search.
Users need to select database and data format, and then input the keyword.
 [+] Enlarge the image
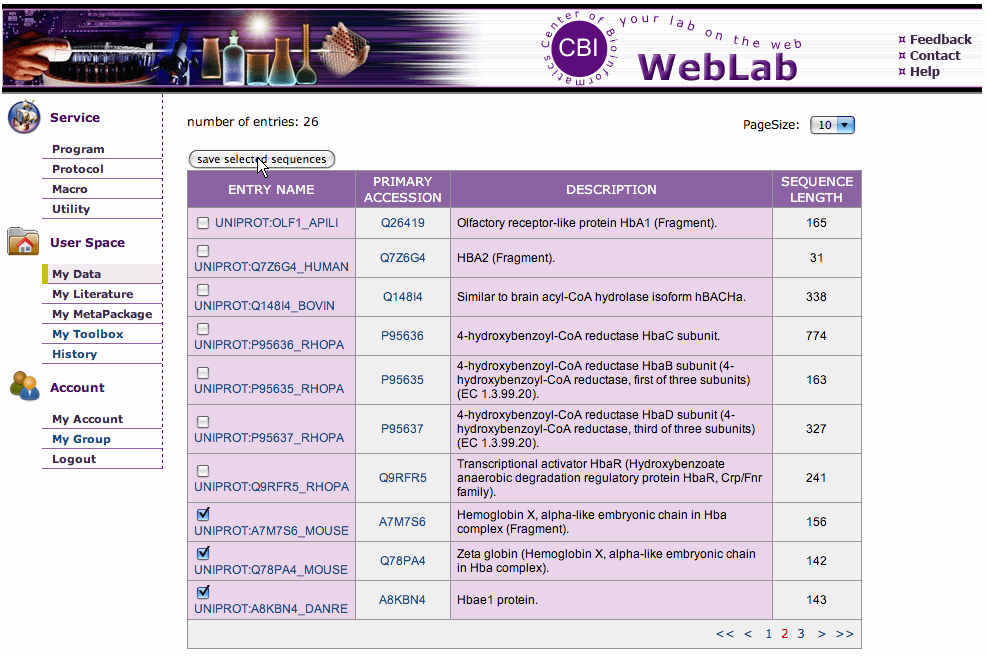
The search result is as follow. User can select sequences which he/she is interested in and then click the
"save selected sequences" button.
 [+] Enlarge the image
[ < ]
[ Help Home ]
[ > ]
|